Word files that get lost or deleted seem inevitable due to system crashes, unsaved changes, corruption, accidental deletion, and even hardware issues. Fortunately, with the built-in AutoRecover or AutoSave feature, you have a big chance to recover lost Word documents.
This guide shares several proven methods to find recovered documents in Word. If you can’t recover deleted or lost DOCX files using the built-in tools, follow other steps to get them back quickly.
If you close a document without saving it, you can often recover it using Word’s AutoRecover or AutoSave feature. This feature will automatically save temporary copies of your document at regular intervals.
Open Microsoft Word, go to File, click Open on the left, and then click the Recover Unsaved Documents button. You can then find recoverable documents in Word.
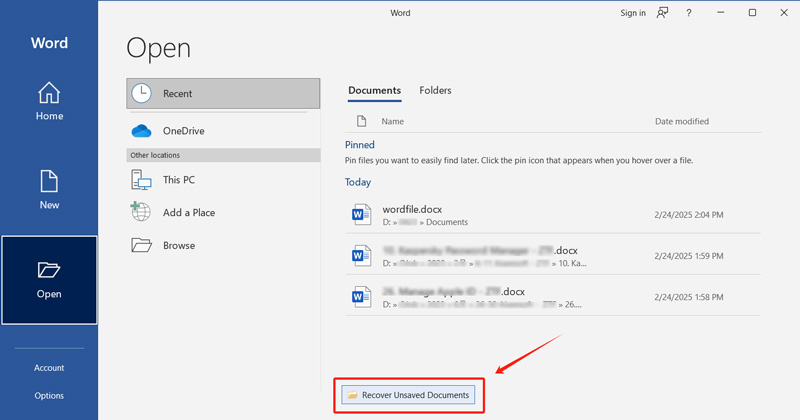
When you locate the specific unsaved document, double-click to open it in Word. Then, edit the file and save it to the correct folder.
If you have set Word to save your documents to OneDrive, the AutoSave feature will continuously save your changes. Go to the specific location where the document was saved.
When you open a document there, Word will load the most recent version of your file.
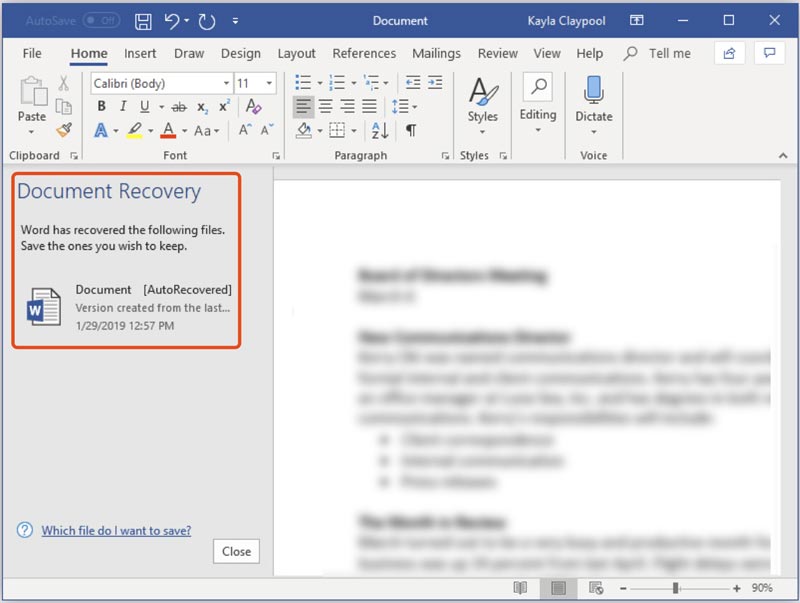
Due to a crash or accidental closure, you may lose your Word document. In that case, you can reopen Word and check unsaved or recovered files from the left Document Recovery pane. You can choose the most recent version to restore it.
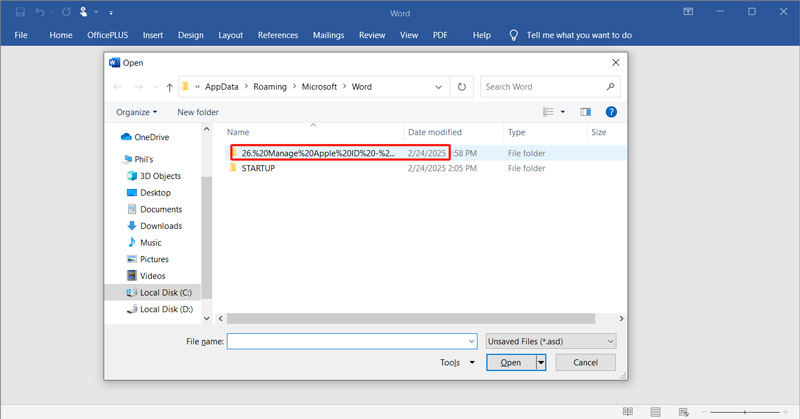
You can also try recovering it from temporary files. When there is no recoverable version, or you can’t find the lost Word document in the Unsaved Files folder, try searching for the temporary file manually.
Open File Explorer on your PC and go to the \AppData\Local\Microsoft\Office\UnsavedFiles folder. If your computer runs an older Windows version, you may need to open the AppData\Roaming\Microsoft\Word folder. Moreover, you can directly search for the temporary Word file in the search bar. Type .asd or .tmp and press Enter to look for associated files.
Scroll your temporary or autosave files with extensions like .asd or .tmp. Double-click the target file to open your document in Word. Then, please save it to a suitable location.
Microsoft Word has a built-in backup feature to create copies of your documents automatically. If this feature is turned on, you can try retrieving your deleted or lost Word files from these backups.
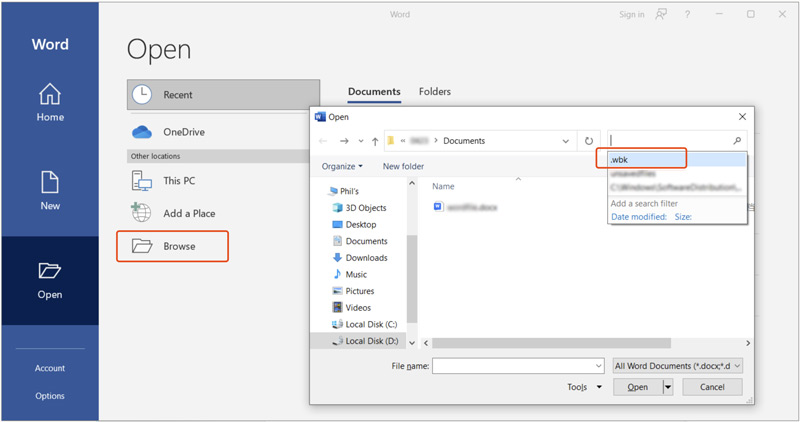
Open Word on your computer, click Open and then Browse. You can type .wbx in the search box to quickly look for backup files. When you find the target file, double-click to open it in Word. Afterwards, you can store the Word document with a new name to avoid overwriting the backup.
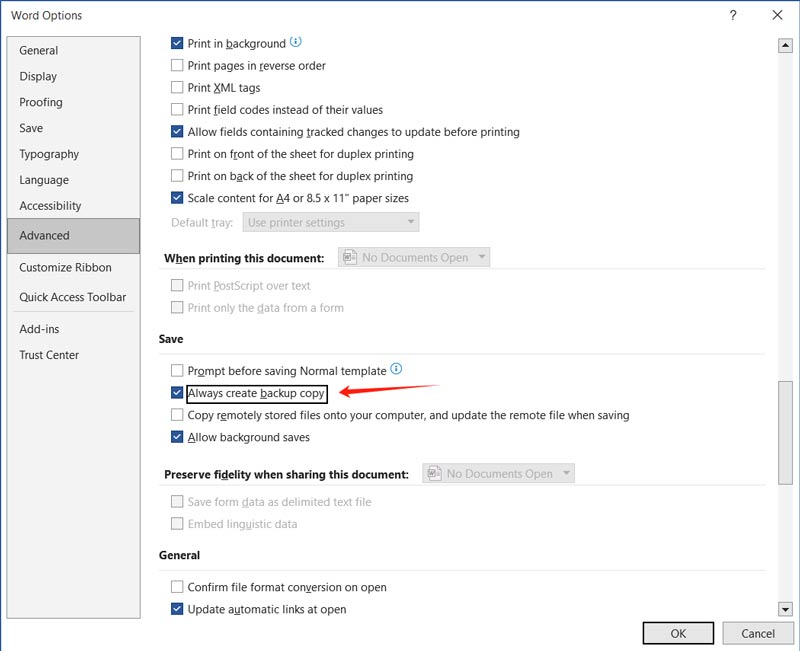
To check and enable this automatic backup function in Word, go to Advanced in Options, scroll down to the Save section, and then tick the Always create backup copy option. Click OK to change the settings and turn it on. If you don’t find a backup file for your Word document, go to the following method.
Like other files, your accidentally deleted Word documents will be moved to your computer’s Trash or Recycle Bin. If you mistakenly erase a critical Word file while managing data, you can easily restore it from the Trash (on Mac) or Recycle Bin (on Windows).
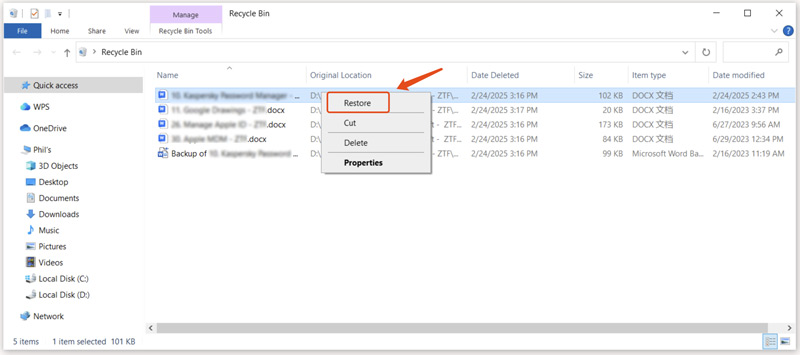
Open the Recycle Bin or Trash and scroll through the list of deleted files. You can use the search bar to find your Word document quickly. When you locate the file, right-click it and select Restore. The DOCX file will be returned to its original location. To recover a lost Word documenton a Mac, right-click it and choose the Put Back option.
If you don’t see your target Word file in the Trash or Recycle Bin, it may have been permanently deleted. After you delete a file using Shift + Delete on Windows or Command + Delete on Mac, the data will bypass the bin.
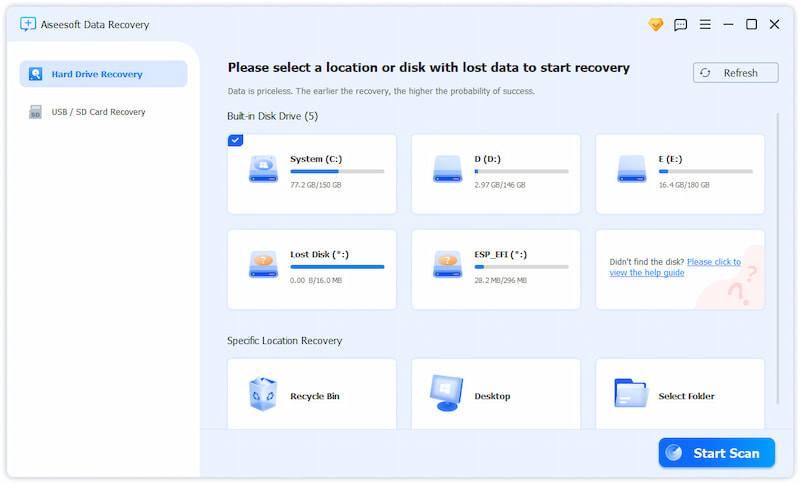
When your Word documents are not in the Trash/Recycle Bin, or they are permanently erased, you can rely on specialized recovery tools like Aiseesoft Data Recovery to scan your device for them. It adopts advanced algorithms to scan your device thoroughly and increase the chances of recovering lost data, even from corrupted or formatted drives. Moreover, Aiseesoft supports recovering other commonly used files, such as photos, videos, audio files, etc. It provides a straightforward way to recover your deleted or lost Word documents.
![]() 100% Secure. No Ads.
100% Secure. No Ads.
![]() 100% Secure. No Ads.
100% Secure. No Ads.
Download and launch the Word document recovery software on your Windows PC or Mac. Scan the drive or folder where your Word documents were stored before they were lost or deleted.
To quickly recover lost Word documents on a Mac, you can only select Document as the file type to scan. That ensures the software focuses on recovering Word files.
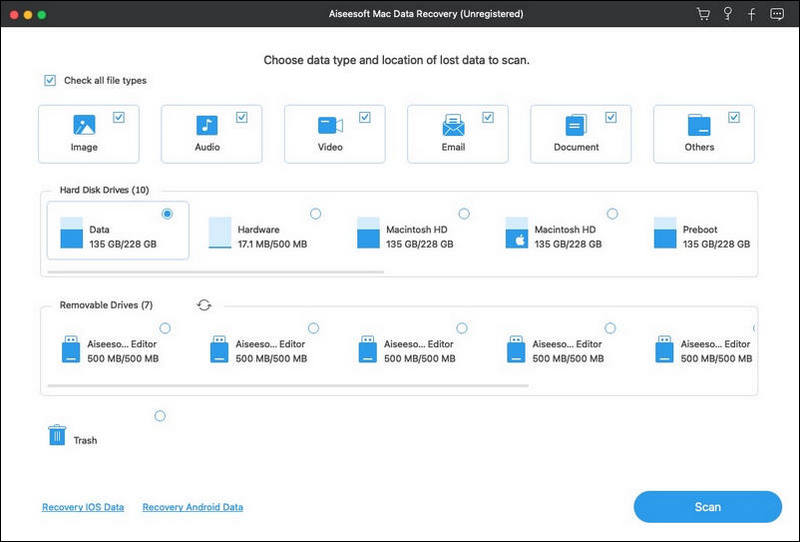
Once you click the Scan button, Aiseesoft will first perform a quick scan to search for recoverable documents. During or after the scanning, you can choose the Document from the list to access related Word files.

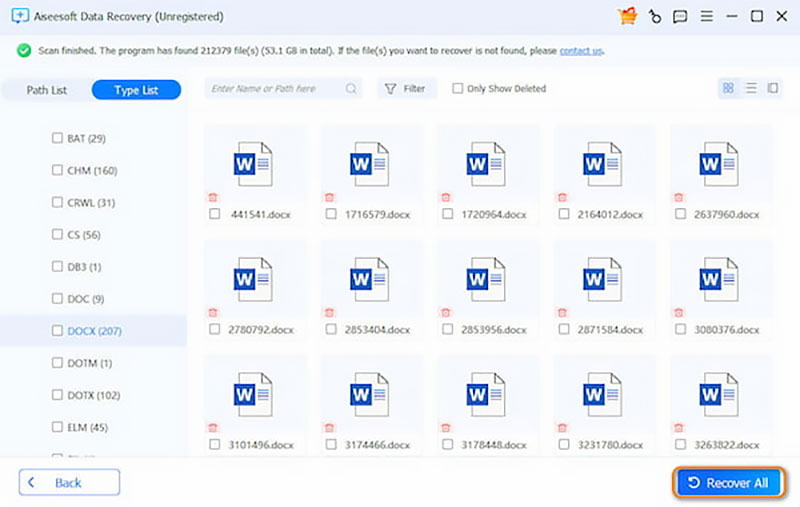
Before recovering documents, you can preview the recovered Word files to ensure they are intact and usable. This viewing feature helps avoid recovering corrupted or unnecessary files. As you can see, you can click DOC or DOCX to locate your Word documents. Select all the necessary ones and then click the Recover button.
Besides Word files, Aiseesoft can retrieve other documents, videos, pictures, and more. It also has AI-powered tools to repair your corrected files like photos. The software has a free version that allows you to recover lost Word documents safely.
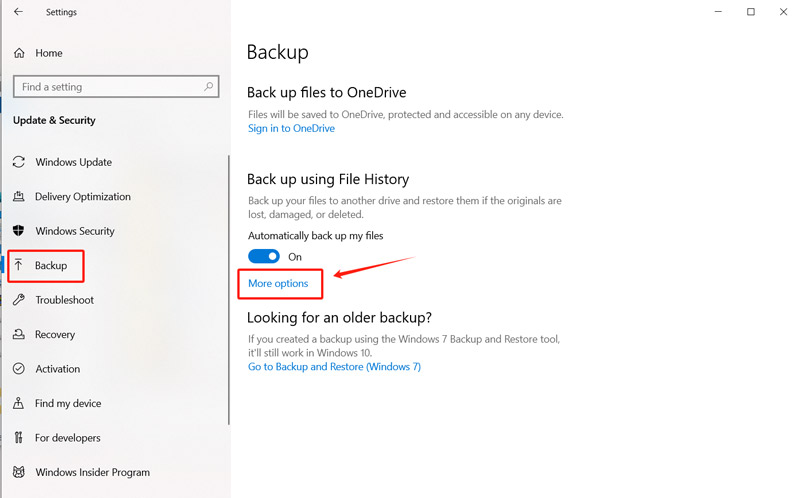
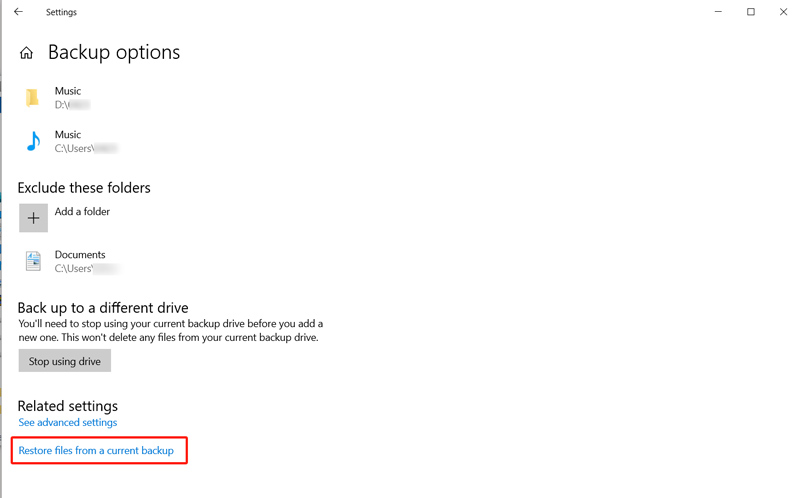
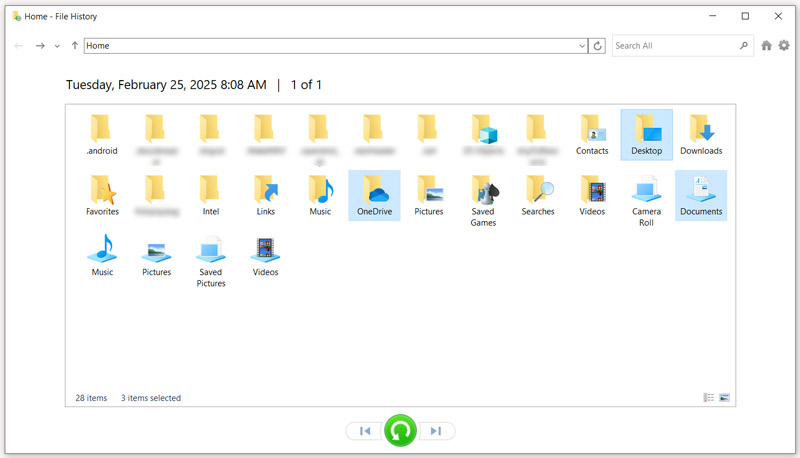
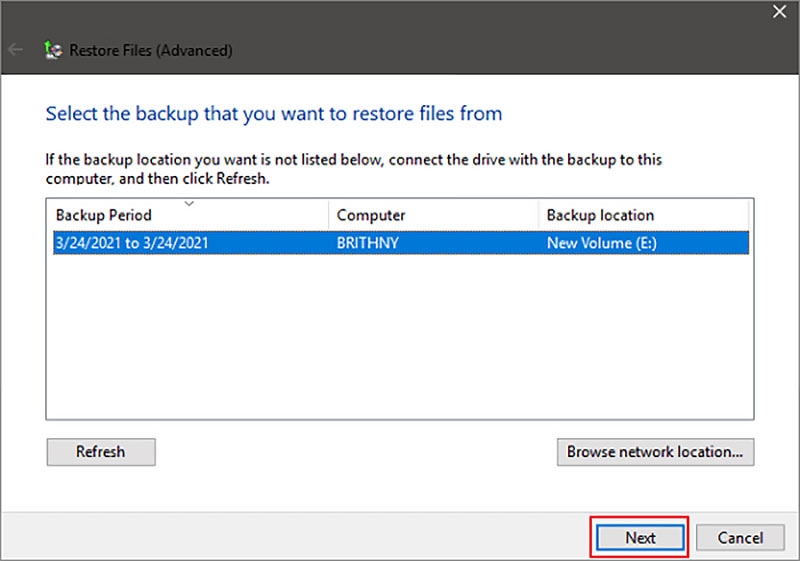
File History (Windows 10/11) and Backup and Restore (Windows 7) are built-in backup features in Windows that can create copies of your files. When your Word documents are lost, you can recover them from a suitable backup file.
Before recovering lost Word documents, you need to ensure File History has been turned on and set to back up your files. If it wasn’t enabled before your Word files were deleted, this method won’t work.
You can rely on the Backup and Restore feature to recover deleted or lost Word documents on Windows 7. Go to the Control Panel, locate the System and Security option, and click Backup and Restore under it. Follow the on-screen prompts to pick the correct backup that contains your lost Word documents.
If you know the name of the recovered document or part of its content, you can try searching for it using Spotlight. Press Command + Space to open Spotlight Search, and then type the name of your Word file. When the target document appears in the search results, click it to open it in Word. Moreover, you can open Microsoft Word on your Mac and browse the recently opened documents list to find your recovered file.
Using Time Machine to create backups, you can recover lost Word documents from a previous backup. Connect your backup drive and then navigate to the folder where the Word files were originally stored. Hit the Time Machine icon and choose to Enter Time Machine. After that, you can use the timeline on the right to browse through previous backups. Locate the Word document, select it, and click Restore to recover it quickly.

Can Word save to the cloud?
Yes, Word document files can be saved to the cloud. You can save documents to OneDrive, Microsoft's official cloud storage platform. You need to sign in with your Microsoft account and select OneDrive as the default location. Once your Word files are saved to OneDrive, they will be synced across all your devices signed in with the same account. Besides OneDrive, you can also save documents to other cloud storage services.
Does Word keep backup files?
Yes, Microsoft Word can keep backup files depending on your settings. As mentioned before, the software will create temporary files while you work. Even though they are not full backups, they can be used to restore unsaved changes. If you have enabled the AutoSave feature in Word, your document will update a temporary backup at regular intervals. These backup files can be recovered when you reopen Word after a crash. Moreover, you can set Word to create a backup copy of your document whenever you save it. You can go to Advanced from Options to access related settings. If you accidentally close Word without saving the current document, you can try recovering it from the Recent Documents.
How can I avoid losing a Word document?
There are several helpful steps you can take to minimize the risk of losing your Word documents. First, you should make sure the AutoRecover or AutoSave feature is enabled. Moreover, while editing a document, you should manually save it regularly. You can set Word to save your document to a cloud storage service. You should also ensure you are using the latest version of Word.
Conclusion
Losing Word files can be frustrating, especially if they contain critical data. Fortunately, you have several proven methods to recover deleted and lost Word documents. When you accidentally close an unsaved file or lose essential documents for other reasons, you can find them back in a suitable way.
 How to Fix Stop Code Memory Management: Diagnose Windows BSOD
Quickly resolve Stop Code Memory Management issues! From diagnostics to troubleshooting, we offer straightforward solutions and aid with data recovery.
 Driver Verifier DMA Violation: Troubleshooting & Data Recovery Guide
Our article easily fixes the Driver Verifier DMA Violation problem, explains how to retrieve deleted data, and provides a solution for recovering data.
 How Windows 10 Show Hidden Files & Folders (CMD & File Explorer)
Our simple guide makes it easy to demonstrate how Windows 10 shows hidden files and folders using File Explorer and the Command Prompt methods.
Find Data
Find Deleted Messages on iPhone Find Deleted Apps on iPhone Find Deleted History on iPad Find Archived Emails in Gmail Find Recovered Documents in Word
Aiseesoft Data Recovery is the best data recovery software to recover deleted/lost photos, documents, emails, audio, videos, etc. from your PC/Mac.
![]() 100% Secure. No Ads.
100% Secure. No Ads.
![]() 100% Secure. No Ads.
100% Secure. No Ads.
